Version Control with Git: Beginner: Setup
Install Git
Please see this section of the workshop template for instructions on installing Git.
Create a GitHub account
Go to https://github.com/ and find the Sign up button. Enter your e-mail and a password. Follow the instructions, which will involve verifying your e-mail address.
GitHub authentication
In order to push and pull from your Github repository you will need to authenticate. There are two ways of doing that:
- with a personal access token
- with an SSH pair.
Both options are relatively equal security-wise. Personal access tokens are generally easier to use, and recommended for beginners. If you are already familiar using SSH, and use them for accessing other remote systems, then SSH would be a better choice.
Create a personal access token for authentication
In order to authenticate yourself to Github on the command line, you need to create a personal access token. GitHub uses personal access tokens for authentication on the command line instead of your Github account password. Personal access tokens work like passwords, but you can generate multiple access tokens for a single account. This has some advantages, you can e.g.
-
Revoke a token when it is not needed anymore
-
Restrict the access scopes of a token e.g. to generate a token that can only be used to push to a repository, but not to change your personal settings.
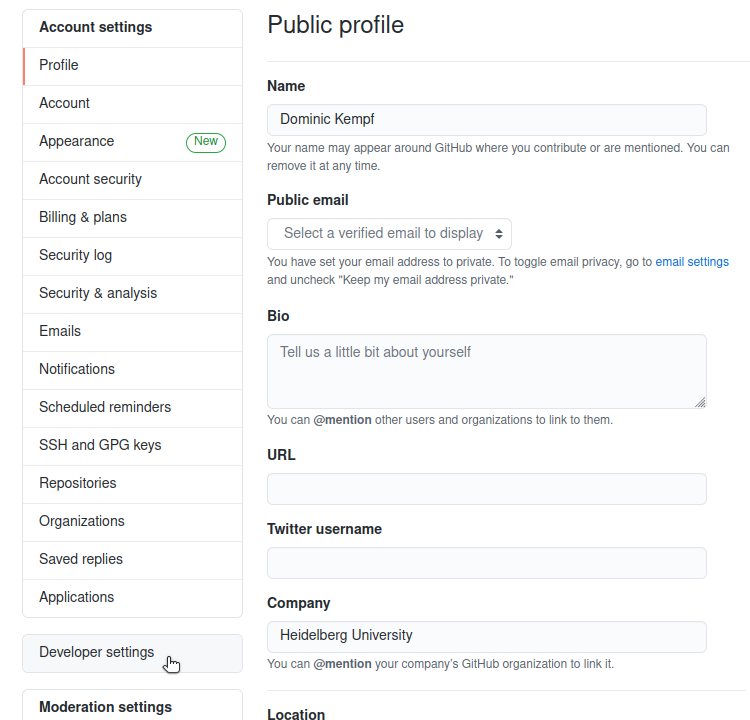
A personal access token can be generated by navigating to your personal settings in the GitHub web interface:

At the bottom left of your account settings, you find the developer settings section:
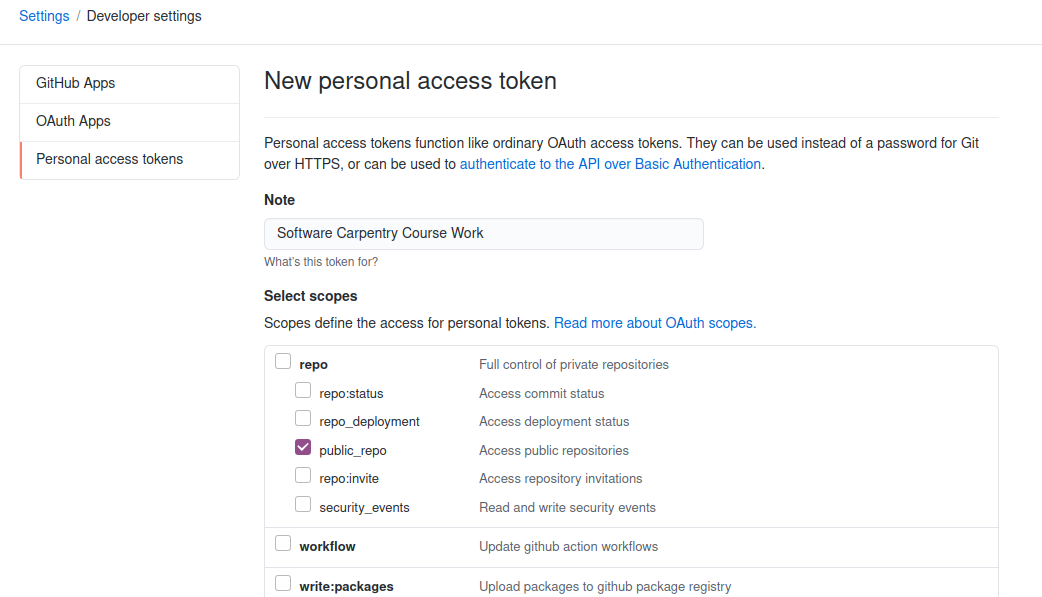
Click on the Personal access tokens tab will allow you to generate a new token:


You can now configure which operations are possible with the new personal access token that we are about to generate. For this course, we only need access to public repositories:
Scrolling down and clicking on “Generate Token” will finalize the generation process. Your token will be displayed on the screen. You need to copy and store this token now just like you normally store passwords. Note that GitHub will never again display this token to you. If you lose it, you have to revoke it and create a new one.
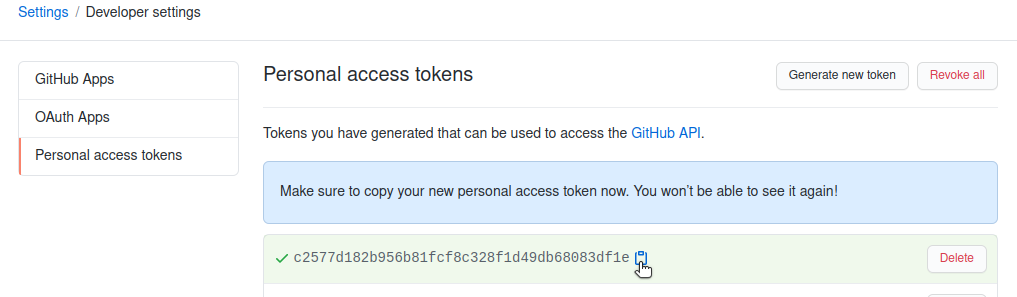
You will need to use this personal access token when GitHub asks for your username and password from the command line.
Interacting with your repository when using a personal access token
The home page of the repository on GitHub includes the URL string you need to identify it:

If you are using the personal access token authentication option you it is important to make sure that the protocol is HTTPS, and not SSH.
Copy that URL from the browser, go into the local planets repository, and run
this command:
$ git remote add origin https://github.com/vlad/planets.git
Create an SSH pair for authentication
Background
Before Dracula can connect to a remote repository, he needs to set up a way for his computer to authenticate with GitHub so it knows it’s him trying to connect to his remote repository.
We are going to set up the method that is commonly used by many different services to authenticate access on the command line. This method is called Secure Shell Protocol (SSH). SSH is a cryptographic network protocol that allows secure communication between computers using an otherwise insecure network.
SSH uses what is called a key pair. This is two keys that work together to validate access. One key is publicly known and called the public key, and the other key called the private key is kept private. Very descriptive names.
You can think of the public key as a padlock, and only you have the key (the private key) to open it. You use the public key where you want a secure method of communication, such as your GitHub account. You give this padlock, or public key, to GitHub and say “lock the communications to my account with this so that only computers that have my private key can unlock communications and send git commands as my GitHub account.”
What we will do now is the minimum required to set up the SSH keys and add the public key to a GitHub account.
Advanced SSH
A supplemental episode in this lesson discusses SSH and key pairs in more depth and detail.
The first thing we are going to do is check if this has already been done on the computer you’re on. Because generally speaking, this setup only needs to happen once and then you can forget about it.
Keeping your keys secure
You shouldn’t really forget about your SSH keys, since they keep your account secure. It’s good practice to audit your secure shell keys every so often. Especially if you are using multiple computers to access your account.
We will run the list command to check what key pairs already exist on your computer.
ls -al ~/.ssh
Your output is going to look a little different depending on whether or not SSH has ever been set up on the computer you are using.
Dracula has not set up SSH on his computer, so his output is
ls: cannot access '/c/Users/Vlad Dracula/.ssh': No such file or directory
If SSH has been set up on the computer you’re using, the public and private key pairs will be listed. The file names are either id_ed25519/id_ed25519.pub or id_rsa/id_rsa.pub depending on how the key pairs were set up.
Since they don’t exist on Dracula’s computer, he uses this command to create them.
Create an SSH key pair
To create an SSH key pair Vlad uses this command, where the -t option specifies which type of algorithm to use and -C attaches a comment to the key (here, Vlad’s email):
$ ssh-keygen -t ed25519 -C "vlad@tran.sylvan.ia"
If you are using a legacy system that doesn’t support the Ed25519 algorithm, use:
$ ssh-keygen -t rsa -b 4096 -C "your_email@example.com"
Generating public/private ed25519 key pair.
Enter file in which to save the key (/c/Users/Vlad Dracula/.ssh/id_ed25519):
We want to use the default file, so just press Enter.
Created directory '/c/Users/Vlad Dracula/.ssh'.
Enter passphrase (empty for no passphrase):
Now, it is prompting Dracula for a passphrase. Since he is using his lab’s laptop that other people sometimes have access to, he wants to create a passphrase. Be sure to use something memorable or save your passphrase somewhere, as there is no “reset my password” option.
Enter same passphrase again:
After entering the same passphrase a second time, we receive the confirmation
Your identification has been saved in /c/Users/Vlad Dracula/.ssh/id_ed25519
Your public key has been saved in /c/Users/Vlad Dracula/.ssh/id_ed25519.pub
The key fingerprint is:
SHA256:SMSPIStNyA00KPxuYu94KpZgRAYjgt9g4BA4kFy3g1o vlad@tran.sylvan.ia
The key's randomart image is:
+--[ED25519 256]--+
|^B== o.          |
|%*=.*.+          |
|+=.E =.+         |
| .=.+.o..        |
|....  . S        |
|.+ o             |
|+ =              |
|.o.o             |
|oo+.             |
+----[SHA256]-----+
The “identification” is actually the private key. You should never share it. The public key is appropriately named. The “key fingerprint” is a shorter version of a public key.
Now that we have generated the SSH keys, we will find the SSH files when we check.
ls -al ~/.ssh
drwxr-xr-x 1 Vlad Dracula 197121   0 Jul 16 14:48 ./
drwxr-xr-x 1 Vlad Dracula 197121   0 Jul 16 14:48 ../
-rw-r--r-- 1 Vlad Dracula 197121 419 Jul 16 14:48 id_ed25519
-rw-r--r-- 1 Vlad Dracula 197121 106 Jul 16 14:48 id_ed25519.pub
Copy the public key to GitHub
Now we have a SSH key pair and we can run this command to check if GitHub can read our authentication.
ssh -T git@github.com
The authenticity of host 'github.com (192.30.255.112)' can't be established.
RSA key fingerprint is SHA256:nThbg6kXUpJWGl7E1IGOCspRomTxdCARLviKw6E5SY8.
This key is not known by any other names
Are you sure you want to continue connecting (yes/no/[fingerprint])? y
Please type 'yes', 'no' or the fingerprint: yes
Warning: Permanently added 'github.com' (RSA) to the list of known hosts.
git@github.com: Permission denied (publickey).
Right, we forgot that we need to give GitHub our public key!
First, we need to copy the public key. Be sure to include the .pub at the end, otherwise you’re looking at the private key.
cat ~/.ssh/id_ed25519.pub
ssh-ed25519 AAAAC3NzaC1lZDI1NTE5AAAAIDmRA3d51X0uu9wXek559gfn6UFNF69yZjChyBIU2qKI vlad@tran.sylvan.ia
Now, going to GitHub.com, click on your profile icon in the top right corner to get the drop-down menu. Click “Settings,” then on the settings page, click “SSH and GPG keys,” on the left side “Account settings” menu. Click the “New SSH key” button on the right side. Now, you can add the title (Dracula uses the title “Vlad’s Lab Laptop” so he can remember where the original key pair files are located), paste your SSH key into the field, and click the “Add SSH key” to complete the setup.
Now that we’ve set that up, let’s check our authentication again from the command line.
$ ssh -T git@github.com
Hi Vlad! You've successfully authenticated, but GitHub does not provide shell access.
Good! This output confirms that the SSH key works as intended. We are now ready to push our work to the remote repository.
Interacting with your repository when using SSH keys
The home page of the repository on GitHub includes the URL string you need to identify it. If you are using the SSH authentication option you it is important to make sure that the protocol is SSH, and not HTTPS.

Copy that URL from the browser, go into the local planets repository, and run
this command:
$ git remote add origin git@github.com:vlad/planets.git
Start in the Desktop folder
We’ll do our work in the Desktop folder so make sure you change your working directory to it with:
$ cd
$ cd Desktop